Thursday, 6 June 2013

Week 10 : Game Trailer

This week I have been busy at home coming up with ideas and making my own trailers on what is hot and what is not.

I have looked around the net for some plugins that could give me the edge on creating a trailer such as fog, clouds, flares or even explosion effects.

While I have experience in making trailers due to me creating trailers and intros for my youtube channel  

My Youtube Channel :


I am confident that I will create some good results and a great final outcome.

During my creation of a game trailer I was influenced by other trailers like Aliens, Call of Duty, Battle Field and even Ghost Recon.

Here are some reference trailers I used as references and influences for my trailer.


Influential Trailers:


Aliens Vs Predator


Call Of Duty Zombies Mob Of The Dead


Ghost Recon 


Final Fantasy


My Final Trailer

Below is my trailer created in Adobe After Effects using CC Particle, Optical Flares by video co piolet, gradients and using opacity transition changes. Below I will explain in detail how I created my trailer.


For creating my trailer I used a plug in called CC Particle. I set the lifespan to 100 (This means there will be 100 particles on screen in the life of the videos length) I then set the colour to blue with the tints of green, a darker blue and even white. I set the colour to randomise 30% meaning the colours selected will have tiny pigments and blend 30% to the video. The particles were originally dots but I feathered the particles to create a cloud like effect.

For the title I imported my logo from Photoshop which I created earlier and changed the opacity to 0% at keyframe 1 ( This will make the title now invisible) After a few seconds into the video I clicked on the title layer "Nephelis" and clicked on the stop watch on position, scale and also opacity. I then skipped a few keyframes forward (3 seconds) and changed the opacity to 100% and scaled the text. This will then give an animation if i was to play the video at this point of the text coming towards the screen fading in and fading out.

For the flare passing past the screen I made a new adjustment layer and added a new plugin called Optical Flares by video co piolet. This is a plugin which allows you to create your own presets, flares, explosions and any other flash that a lens may cast. I then scaled the position and brightness to where I wanted the flare to appear and also clicked on the stop watch to my liking on when I wanted the flare to be bright, and when i wanted to to disappear. I did this by clicking opacity and key framing it as before on the logo and also by adjusting the brightness keyframing.

after following these steps I had to render my video in after Effects by making two copes of the video, one as a MP4 and one as MOV file.

To make rendering faster I pressed the caps lock (This will prevent RAM preview when rendering, and will make video rendering ALOT faster).

Finally I uploaded my video to YouTube for others to view in 720p HD as blogger does not upload in HD and compresses videos to only 360p quality.


Week 9 : In game tracks and learning garage band

After creating sound effects for my game it was now time to create music for my game. How ever I used garage band to create my audio on a friends Mac computer as I do not own a MAC so I had to ask a friend in my free time if I could use garage band. After my friend taught me the basics of how to use  garage band me and my friend constructed some good instrumentals using the software.

In the songs we have used real life sound recordings of cave drops and also my friend playing electric guitar. After I recorded him playing guitar we put the tracks into garage band and edited the music together.

In the video I created below you will hear a "Roaming" track where the player will hear this track when walking across the landscape/cave, "Battle music" when the character encounters a fight with an enemy and finally a "Boss Theme" for when the player encounters the boss character of the game.

Below I will attach some screen shots of garage band.


Battle Theme


Created using Audacity, Garage band and all pieced together edited using Adobe After Effects.

The video was then uploaded to YouTube for better quality sound.


After showing my friend some influences of a battle song me and my friend came up with a track using the majority of instruments to see what would work and what sounded good.


Towards the end of our song our song our song sound retro so we changed it slightly so it sounded quite demonic for a boss fight. The final product sounded how I wanted it and was very pleased with the results that me and my friend achieved.

Earlier on in the week I did not know how to work garage band but towards the end my friend showed em and gave me some good knowledge on how to use it.

Week 8 : Combat System Sounds

This week I have studied on making sounds for my game such as sound effects you will hear in the game either being attacked/hurt, magic spell casts or even monster groans and moans.

Below I make a montage of sounds in a program called Audacity and edited the video together using Adobe After Effects from home.

I will also upload pictures below on how I created the audio on what effects were used and how I recorder them.


In Game Sounds


This is my in game sounds for my battle system. Each sound will be played if either a character is attacked, casting a spell or ambient noises from the monster. In this video there are a few examples and experiments on what sounds I like and what sounds I wont choose.

I created the sounds using a program called Audacity a free program found on http://audacity.sourceforge.net/

The site is free to use and comes with a wide variety of sound effects and tools to use for either film making, music making or even game making.

Below I will upload a few pictures on how I created the sound clips and what effects were used.


First of all we have the track but notice I have left a few seconds for the clip before I even begin my audio. This is simply to pick up background noise purposely so I can use the softwares effects to remove background noise using an effect. This will make the track sound more professional and remove any horrible grainy sound and crisps that may occur in some audio.

Below in the next picture you will now see how I remove background noise by only selecting the first part of the audio.


As you can see I have highlighted the audio I wish to get the noise from. I then clicked on effects and then noise removal. This will then pop up another window and an option will say "Get Noise" once you selected a certain part of your clip I.E the background noise then highlight all your clip by pressing and holding CTRL + A (This will select all your audio) then click remove noise.

With the noise now removed you will see the background noise become a flat line indicating no noise. This is perfect for making professional sounds.

The next picture you will see how I created my monster groaning effect. Due to voice acting I did not have to do much editing apart from noise removal and change pitch making my voice seem much more deeper than what it is. This gave the demonic sound that I was looking for to give my monster that evil presence of being an enemy and not a friendly.


As you can see I highlighted all my audio after I used the noise removal effect as shown before I then used another effect called "Change Pitch" I simply lowered the percentage of DSB and removed it to the negative (This will make sound appear deeper) I used this on my audio to give me the demonic monster effect that I wanted as stated above.

Week 7 : Logos

NEPHELIS LOGOS

For this week I have been designing logos and designs for my game and future trailer.

I will be creating the trailer in After Effects CS5 from scratch and even my own sound applied to the trailer. 

Here are some examples of my Logos created for my game using photoshop CS5.

I will also explain how I made the logos and what fonts were used such as techniques used to give the effects I was left with, Either being Drop shadow, outer glow, Beval and emboss and even gradients.

The first logo was created by a font named Century Gothic. I then aligned the text to make them appear closer together and added two lines, one above and one on the bottom. I thought this would add more in depth of field to the logo/title. (This is not the final product)
The second logo was created using the font Bank Gothic. I then rasterized the text into making it an image for me to edit. I then used the eraser tool and held shift to get a straight line. I used the eraser from one side of the font to the other to create the line and I then clicked on the blending options and clicked gradient overlay. I made one gradient white and the other black. This gave the effect of a metallic look that I was looking for this kind of font in particular. (This is not the final product)

The third logo was created by the font called eccentric std. I then went onto the blending options and clicked shadow overlay and positioned it where the font appears to have an angled shadow. I then added an outer glow to give the font more of an effect and stand out from the shadow. (This is not the final product)
lastly is my final design before I decide to create my final Logo for my trailer by combining the logos which I like and will work for my project. The font I used for this logo was Lucida Blackletter. I then added two lines on the top and bottom of the logo to give the logo some kind of outline because the logo seemed quite bland without lines or some kind of symbol. (This is not the final product)


All Logos Together


My Final Logo

After combing all my logos which I liked together I came across this as my final logo.


How I created my Logo was by using the font Bank Gothic by using the eraser on the letter E for some further effect. For the letter I and N I was influenced by the logo of metal Gear Solid. I used this to give me some idea of what I wanted for my logo.

I also selected the end of the N and the end of the I and copied the layer. I then stretched the selection and then made another layer to rotate the lines going left and right. (Reason for making another layer was the pixels were blurring and stretching the other way) so to prevent this I changed the angel to 90° for both the N and I and stretched them to the other side, This then gave me the outlines for my title. 

Monday, 20 May 2013

Week 6 : Battle System Further Research

For further research I studied more about coding on YouTube and other websites. For using #C and Java script. In order for me to create my combat system I will need to rely on a lot of variables and if statements.

For my tutorials on how to learn JAVA script and #C I used the following links:

Battle System
http://www.youtube.com/watch?v=AaKyAZdhtLY&list=WLCBF95203CA83CD34

Learning JAVA script
http://www.youtube.com/watch?v=_cLvpJY2deo

Learning #C
http://www.youtube.com/watch?v=r1Hjp2ncY64

Creating GUI
http://www.youtube.com/watch?v=dz1GaLH-9t4

Unity Basics (Creating the Landscape)
http://www.youtube.com/watch?v=5wxe1IUu5QA

Turn based Tactical Combat System
http://www.youtube.com/watch?v=qC13uS6vBfU


After researching on how to create a combat system and Java script I attempted my own combat system using GUI, JAVA script, #C and character modelling.

Below is some images of my game combat system in progress.


For more research for my game I wanted to add some music/ audio for my game. I did not want a silent game so I wanted to look for influences of other games, films and other sources for audio when creating my own music for my game.


Music Research and influences

Final Fantasy 8 Boss Fight
http://www.youtube.com/watch?v=54r8t_5ayto

Final Fantasy 8 Man With a Machinegun
http://www.youtube.com/watch?v=3jho-peCAKs

Final Fantasy 7 Boss Fight
http://www.youtube.com/watch?v=FxUzIrhINP4

Kingdom Hearts Boss Theme
http://www.youtube.com/watch?v=SwSIUSVIXGs

Metal Gear Solid Boss Theme
http://www.youtube.com/watch?v=rad3r9sjVSM

Heroic Battle Music
http://www.youtube.com/watch?v=ETzYUgT4qbg

Star Wars Episode III Obi-Wan vs Anakin
http://www.youtube.com/watch?v=tztuGMPLAmI

Star Wars Episode I Darth Maul Theme (Dual Of Fates)
http://www.youtube.com/watch?v=CqZpX3QnO3g

Pokemon League Remix
http://www.youtube.com/watch?v=exl5W4PLcew

Pokemon Trainer RED Encounter (Orchestral Remix)

http://www.youtube.com/watch?v=E3t6Y7zh1LU

Week 5 : Battle System Research

Before I create my game, the game will have its own combat system. My combat system I am designing will have the popular combat system in any RPG ever known. The game I am influenced by for combat system is a game called final fantasy. The combat system will be turn based and the level cap of attack damage will be capped at 9999.

During my research I was viewing a video tutorial on YouTube on how to create a Final Fantasy turn based combat system.

Due to the up loader deactivating his account, this has dramatically set me back as I was following his tutorials to the near end of my work. Starting from fresh following other tutorials on YouTube has become such a struggle.

After finding other sites I was even tempted to buy a script for my combat system due to the stress of being behind and added pressure of making a great game. As this is a joint project with my class mate I do not want to let him down but due to the complex detail of code required for the combat system me adn my partner require is asking for to much for a coder of my skill level.

Creating my combat system will require advance training in #C (pronounced C sharp) ,JAVA script, GUI's and even Animation.

Studying #C and JAVA script in such short space of time is already adding pressure but after studying other turn based systems I could simplify my game without animations and only using variables and if statements. This will be quicker to do but will not look as me and my partner had planned, But due to the lack of tutorials and experience in code I am creating something to advance for my own skill level but I will still attempt to create a turn based combat system.

Here is some examples of JAVA script for my combat system.

  1. var turn : int = 1;
  2. var phase : int = 0;
  3. var enemyToAttack : String;
  4. //player stats
  5. var playerCurHp : float = 100.0;
  6. var playerMaxHp : float = 100.0;
  7. var playerMinAttack : float = 5.0;
  8. var playerMaxAttack : float = 10.0;
  9. var enemyTurnActivated : boolean = false;
  10. function Start () {
  11. }
  12. function OnGUI () {
  13. var otherScript: MainGame1 = gameObject.Find("MainGame").GetComponent(MainGame1);
  14. if(otherScript.inBattle == true) {
  15. // If it's the players turn then show combat buttons
  16. if(turn == 1) {
  17. //select attack
  18. if(phase == 0) {
  19.  if (GUI.Button (Rect (Screen.width / 2 - 600,Screen.height / 2 + 200,140,20), "Attack")) {
  20.   phase = 1;
  21.  }
  22.  if (GUI.Button (Rect (Screen.width / 2 - 600,Screen.height / 2 +225,140,20), "Item")) {
  23.   phase = 2;
  24.  }
  25.  if (GUI.Button (Rect (Screen.width / 2 - 600,Screen.height / 2 + 250,140,20), "Run")) {
  26.   phase = 3;
  27.  }
  28. }
  29. //attack selection
  30. if(phase == 1) {
  31.  if (GUI.Button (Rect (Screen.width / 2 - 600,Screen.height / 2 + 200,140,20), "Slice")) {
  32.  turn = 2;
  33.  phase = 0;
  34.  }
  35.   if (GUI.Button (Rect (Screen.width / 2 - 600,Screen.height / 2 +225,140,20), "Back")) {
  36.  phase = 0;
  37.  }
  38. }
  39. if(phase == 2) {
  40.  if (GUI.Button (Rect (Screen.width / 2 - 600,Screen.height / 2 + 200,140,20), "Health Potion")) {
  41.    turn = 2;
  42.    phase = 0;
  43.  }
  44.   if (GUI.Button (Rect (Screen.width / 2 - 600,Screen.height / 2 +225,140,20), "Back")) {
  45.  phase = 0;
  46.  }
  47. }
  48. if(phase == 3) {
  49.  if (GUI.Button (Rect (Screen.width / 2 - 600,Screen.height / 2 + 200,140,20), "Run Away")) {
  50.    phase = 0;
  51.    
  52.    otherScript.inBattle = false;
  53.  }
  54.   if (GUI.Button (Rect (Screen.width / 2 - 600,Screen.height / 2 +225,140,20), "Back")) {
  55.  phase = 0;
  56.  }
  57. }
  58. }
  59. }
  60. }
  61. function Update () {
  62. //enemies turn
  63. if(turn == 2 && enemyTurnActivated == false) {
  64. enemyTurnActivated = true;
  65. enemyTurn();
  66. }
  67. }
  68. //After the player attacks then it's the enemy attack phase
  69. function enemyTurn () {
  70. Debug.Log("enemy 1 turn began");
  71. Debug.Log("enemy 1 attacked");
  72. enemyTurnActivated = false;
  73. turn = 1;
}

This is my combat system using JAVA script in Unity4.

Here is some screenshots of my GUI for my combat system created in Photoshop CS6 and how I created them.


This will be the player HUD displaying the characters name, HP, MP and also the ATB bar ( Active Time Bar).


When the ATB bar fills up to the top this will be displayed for the playable character to select his next move, either being Attack, cast a spell using Magic, or selecting an item in the Items menu such as potions or poisons.


After the Magic has been selected the character will perform a magical attack called Wind Strike. This will inflict elemental damage to the monster dealing more damage or less damage depending on the monsters weakness or strength level. If the monster was a lighting type then the move lightning would be pointless using
against it as the monster would absorb your attack, so using your basic attack would be more useful than always relying on your magic abilities.


Lastly is the HUD that is displayed. When a move is being casted or used by either player or enemy the box will appear on the top of the screen in a transparent window to still be able to see the background and not block out the landscape. The window will vanish after 3 seconds of the move being casted after the turn is ended.


I will now explain how I created these in Photoshop using screenshots, there will be a KEY which I added in the left corner of the screen in some screen shots indicating what some icons mean.


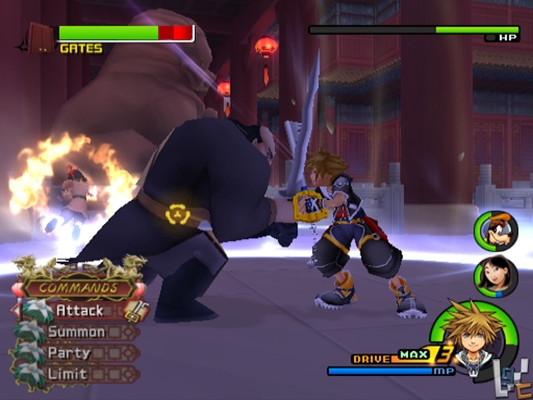
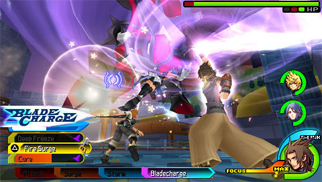
For influences of a turn based combat system I used a reference from Final Fantasy, Kingdom Hearts and Dragon Quest.

Dragon Quest


Final Fantasy


Kingdom Hearts


I admire